


With nearly 7,000 distinct languages spoken worldwide, language barriers frequently pose challenges when communicating across cultures. Although no single universal language exists, English often acts as a common bridge for global communication. As a lingua franca, it is widely used by individuals from different countries who seek to connect and converse with one another. In this sense, English comes closest to being considered a "universal language."
Despite this, many people have limited proficiency in English or do not speak it at all. Some are limited to their native tongue because they never had the desire or need to learn English. This raises an intriguing question. How do people navigate the Internet and communicate effectively without knowing English, especially when much of the online content is produced in English?
Take Germany as an example. The country is well known for its high quality of life. This means that the average German does not necessarily need to leave Germany to make use of modern amenities. However, that is not the sole reason Germans can manage without English. A significant factor is that a great amount of content in Germany is translated into German. Not only is written material translated, but audio content—such as movie dialogues—is also dubbed into German.
To demonstrate how accessible dubbing can be, this series of articles will focus on creating an automatic dubbing system in Python.
How Does Dubbing Work?
The typical pipeline for dubbing videos is a complex, multi-stage process. It aims to preserve the original content's integrity while ensuring the final product resonates with the target audience.
The first step involves transcribing the video and translating the original script into the target language. This translation is typically not literal. Instead, it requires adapting idioms, jokes, and cultural references to make them appropriate and relatable for the new audience. In some cases, the content itself may be modified to better suit the cultural context, although this is not always necessary.
Once the script is translated, it is further modified to match the lip movements of the on-screen actors. This process often involves rephrasing sentences to align syllable counts and mouth movements. Doing this significantly simplifies the synchronization of the new audio with the original video.
The next step is voice casting. There are auditions to find the best voice actors whose vocal qualities match the original actors or the ones who best match the characters in the video. These actors typically record multiple versions of the translated script to capture different nuances. The best versions are then selected for the final product.
After recording, the new audio is synchronized with the original video. Post-processing is often performed to remove any unwanted noises, ensure consistent audio levels, and apply additional effects to match the acoustics of the scene. The complexity of these steps can vary. For example, dubbing a podcast is generally easier than dubbing a movie because there are fewer elements, such as background sounds or music, to manage.
Traditionally, dubbing has been an expensive and time-consuming process. However, advancements in artificial intelligence have begun to enhance this workflow. Modern pipelines can leverage neural networks to automate many aspects of dubbing. This significantly reduces both time and cost.
What Are the Parts of an Automatic Dubbing Pipeline?
To automate the dubbing of a video, our pipeline needs to perform the following steps:
- Extract the audio from the video
- Transcribe the extracted audio
- Translate the transcription into the target language
- Generate new audio in the target language
- Synchronize the new audio with the original video
- Replace the original audio of the video with the new dubbed audio
This means that in general we need to build these pipelines:
- Preprocessing pipeline
- Transcription pipeline
- Translation pipeline
- Audio generation pipeline
- Postprocessing pipeline
Each of these pipelines addresses specific aspects of the dubbing process. This article will discuss the plan for constructing each pipeline. The subsequent articles of this series will demonstrate the way of implementing each one using Python.
To keep the process straightforward, dubbing movies will be avoided. Such a process would shift the focus more toward sound design and engineering rather than the dubbing process itself. Instead, for this series of articles, we will dub a video that I record in a setting similar to a typical podcast.
Article continues below
Want to learn more? Check out some of our courses:
What Is the Preprocessing Pipeline?
The preprocessing pipeline will be quite simple since we will be working with a video recorded in a setting similar to a typical podcast. The only function of this specific pipeline is to extract the audio from the original video. If the audio quality of your video is not especially good, you might consider adding some preprocessing techniques here, such as noise reduction. However, for demonstration purposes, I will use a video with audio that it is not exceptionally clean. This will illustrate that even without cleaning the audio, the transcription models in the following pipeline should still accurately transcribe the text without any issues. The Python library called MoviePy will be used to extract the audio from our video.
MoviePy is a Python library designed for handling video editing tasks. It enables users to perform a wide variety of operations, ranging from simple tasks like extracting audio (which is what we'll be using it for) to more complex tasks such as video compositing, video processing, and creating custom effects. Specifically, we will use MoviePy to extract the audio from our video in WAV format. Most neural network transcription models work with this format.
The WAV (Waveform Audio File) format is a standard for storing audio bitstreams on computers. Models prefer working with WAV files over formats like MP3 because WAV does not apply any compression to the audio data. In other words, we get the highest possible quality representation of the audio to feed into our transcription models. In contrast, formats like MP3 use lossy compression, reducing the size of the audio file at the cost of losing some audio quality.
What Is the Transcription Pipeline?
This pipeline plays a crucial role in the auto-dubbing system. If the transcription of our original audio is inadequate, the subsequent translation will also suffer, resulting in a subpar final product. Therefore, we must use a model that provides the highest possible quality of transcription.
In the field of deep learning, models that generate transcriptions from audio are called Speech-To-Text (STT) models. These specialized models are designed exclusively to analyze audio files (typically in WAV format) and produce transcriptions. In the past, these models were relatively slow and not particularly accurate. However, with the advent of Large Language Models (LLMs), STT models have reached new heights and now excel at transcription tasks due to several factors.
First, they are trained on vast amounts of textual data from diverse sources. This extensive exposure enables them to recognize a wide array of vocabulary, slang, accents, and dialects. As a result, their ability to accurately transcribe spoken language into text has improved.
Second, because of their training, they possess strong contextual awareness, allowing them to interpret the meaning of homonyms and predict words based on the surrounding context. This reduces common transcription errors, such as mishearing words that sound similar. Additionally, even when speakers make mistakes, these models can correct errors by cross-referencing the transcribed text against learned language patterns, leading to more accurate final outputs.
Finally, these models can be further fine-tuned on specific audio datasets, making it possible to specialize them in certain domains. For instance, by providing enough medical transcriptions along with the corresponding audio, we can help the model adapt to the medical field. This enables it to recognize specific keywords or terms it might have previously missed.
There is a plethora of LLMs we can choose from for transcription. In this series of articles, we will use the Whisper model from OpenAI. Although this model was initially only accessible through OpenAI, it has since been made open-source. Other models, such as Kaldi, Vosk, and Wav2Vec, are also available. Afterward, you can try using those to compare the results with those we obtain here. However, Whisper remains one of the most accurate models, especially the version we will use. We will leverage the HuggingFace library to access the Whisper model.
HuggingFace is a platform that enables users to easily download and use various models, access datasets for fine-tuning, and much more. We will take advantage of HuggingFace's ability to download the pre-trained Whisper model. A pre-trained model has already been trained, so there is no need to train it ourselves. This is beneficial because it saves us a significant amount of time. We can simply download the model and use it for inference. The particular Whisper model we will use is the Whisper large-v3 model, a variant trained on 5 million hours of audio.
Although we will be using this specific Whisper model, we will build the pipeline to allow users to easily experiment with any other model from HuggingFace. Since all models share a similar interface, building a pipeline that is essentially "plug and play" is relatively simplistic, and that is our goal.
What Is the Translation Pipeline?
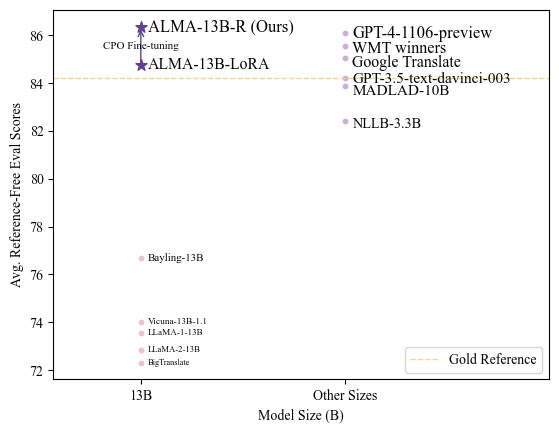
The translation pipeline is the second most critical component of an auto-dubbing system. The transcription of the original audio might be flawless, yet that would mean little to nothing if the translation into another language is inaccurate. When building a translation pipeline, we have numerous options to choose from. The image below illustrates how different neural network models perform in translating from one language to another:
As can be seen, the current top-performing models are a variant of the GPT-4 model and the ALMA-13B-R model. In constructing our translation pipeline, I will ensure it is largely "plug and play," allowing users to easily experiment with different models if they wish. However, I will specifically compare the results from two models:
- ALMA-13B-R
- Google Translate
In a forthcoming article on building this translation pipeline, we will explore the details. While the ALMA-13B-R model produces slightly better results, I have noticed a significant difference in translation speed on my computer. This prompts the question of whether the small improvement in accuracy justifies the additional time required. Nonetheless, we will translate our transcriptions using both ALMA-13B-R and Google Translate, and compare the outcomes. After that, we will feed the translated text into the audio generation pipeline. I will use the version of ALMA available on HuggingFace, while the Google Translate translations will be done using the deep_translator library from Python.
What Is the Audio Generation Pipeline?
Just as we use specific models called Speech-To-Text (STT) models for transcription, we use Text-To-Speech (TTS) models to generate new audio from text. These models are specifically designed to convert written text into spoken words. In the past, TTS models produced results that were not quite convincing. The synthesized voices often sounded robotic and unnatural, making it easy to tell that the audio was computer-generated. However, advancements in technology have significantly improved TTS models. Today, they perform exceptionally well and can generate speech that, unless observed closely, is indistinguishable from a real human voice.
However, this presents a challenge: most of the best TTS models are not open-source. They are typically accessible only through paid subscriptions to the companies that own them. This is understandable, given the exceptional results these models achieve. For instance, ElevenLabs has reached impressive heights in speech synthesis. Their service allows users to choose from a variety of synthetically generated voices in 32 different languages. Users can select specific characteristics for their synthetic voice, such as the age of the speaker, accent, tone, and more, making each voice distinct.
Of course, if we restrict ourselves to using Python without accessing external resources, the results will not match those produced by companies specializing in fake voice synthesis. Their focus and expertise allow them to achieve much higher quality. However, we can still get decent results. As our TTS model, we will use the model developed by Facebook in their Massively Multilingual Speech (MMS) project. This model is available on HuggingFace.
We will not have the flexibility of choosing different accents or other voice characteristics. However, the synthetic voices generated by this model are still particularly good and highly convincing, to the point that it is difficult to tell that the voice in question does not belong to a real person.
What Is the Postprocessing Pipeline?
After generating the synthetic voice based on the translated transcription, there are just two more tasks to complete. First, we need to synchronize the new audio with the original video. Then, we need to overlay the synchronized audio onto the original video to produce the final result. Although these steps might seem simple, these final touches can "make or break" the overall outcome. This is especially true for the synchronization of audio and video. It doesn't matter if we have perfectly transcribed and translated the text or if our synthetic voice sounds human-like. If the audio does not align with the original video, the quality of the auto-dubbed content will suffer. There are several approaches we can take here, ranging from naive methods to more advanced techniques.
Depending on the chosen approach, different libraries will be used. For some of the simpler methods, we can continue using the MoviePy library to extract audio from the original video, along with a library specialized for handling WAV files, such as the wave library. More advanced approaches require us to use specialized libraries like the librosa Python library. There are many options available, therefore I will skip this topic for now. Instead, the article that focuses on building the post-processing pipeline will further shed light on this.
This pipeline represents the final step in our auto-dubbing system. It is responsible for producing the fully dubbed video by combining the original video with the dubbed audio.
- Intro to Programming: How to Get Your Computer Ready to Run Python
- Python in Excel: The Future or Merely a Gimmick?
This article serves as a roadmap for building an auto-dubbing system, explaining the motivation behind its creation and breaking down the system into its core components. We provide an initial overview of each component—the various pipelines required to construct the auto-dubbing system—and explain which Python libraries and deep learning models we will use to build them. In the subsequent series of articles, we will fully develop the system. We will start from the preprocessing pipeline and continue to the post-processing pipeline, ultimately assembling everything.

